

How To Make A Windows 95 Virtual Machine
A great way to save yourself from viruses, malware and spyware is to use a virtual machine to scan the Internet instead of your regular Windows PC. So what is a virtual motorcar? It's basically a full copy of Windows that runs inside another copy of Windows called the host.
The virtual version of Windows is just a big file and special software running on your Windows estimator (virtualization software) acts as a false computer so that Windows can run. Anything you practice in the virtual motorcar volition not affect your host operating system. And so you could download 10 viruses onto the virtual machine and your main operating system would be safe.
What'southward nice about virtual machines is that y'all can reset them. And then if you become a virus while browsing in the virtual machine, yous can simply reset the virtual automobile to the default state when you lot offset installed it and beginning over. It's also a great way to increase your privacy because you tin can simply erase anything you've done in a virtual machine.
Earlier we get started, permit's talk near the requirements. At that place are many software virtualization tools out there like VMWare, Parallels, VirtualBox, etc., merely I'm going to stick with only Microsoft software. In order for this to work, you need two things:
- Disk2VHD – A free tool from Microsoft that volition exist used to convert any Windows operating organization from Windows XP onwards into a virtual machine file.
- Windows 8.1 Pro or Windows 10 Pro – Y'all'll need the Pro versions of either Windows eight.1 or Windows 10 in order to complete this process. Both operating systems have a tool called Hyper-V that tin can be used to access the virtual file created by Disk2VHD.
It'south likewise worth noting that fifty-fifty though yous can use Windows XP, Vista and 7 as the virtual machine, information technology's all-time if you can convert a Windows 8.1 or Windows 10 machine because the highest resolution that Hyper-5 supports for those older operating systems is 1600×1200. It's actually annoying and I don't know why Microsoft hasn't bothered to fix this issue still. Anyhow, information technology's just a problem for those with high resolution monitors.
Convert Windows OS to VHD
Let'due south showtime with the like shooting fish in a barrel function: converting your current version of Windows into a virtual auto (VHD or VHDX file). To practise this, download the Disk2VHD tool mentioned above and run the EXE file.
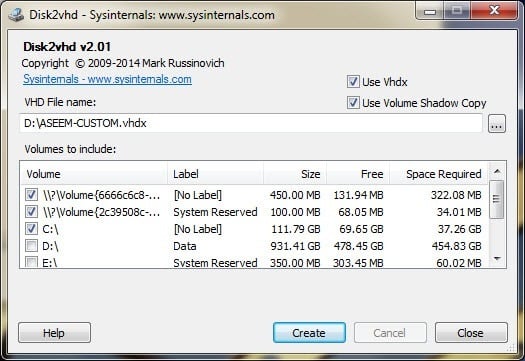
When you run it, you lot'll see a screen similar the one above. There really isn't much you have to do hither other than choose the location where you desire to save the VHDX file and which volumes you want to include.
If you take a large difficult drive, you can just let information technology save the file to the same partition every bit Windows. If not, choose another location like a second hard bulldoze or an external USB hard drive. By default, it's going to select all of the volumes it finds on your computer, which may not be desire you actually desire.
In my case, I have several hard drives continued to the computer, then I only want to select book C:\, which is 37.26 GB in size. In addition, you want to make certain to select any other volumes that were created when you installed Windows, nearly likely the Boot volume and System Reserved volume. These are usually really small: in my example, the System Reserved volume is only 34 MB and the other volume, which has no label, is only 322.08 MB.
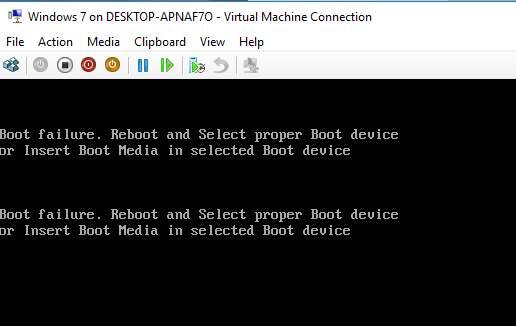
It'south very important that you lot select these other volumes in addition to the main Windows volume because if you don't, the operating organization won't boot when you load it into Hyper-5. Instead, you'll go a Boot Failure message! This is because those ii extra volumes tell the system where Windows is located and how to kicking it.
It volition probably have some time to create the VHDX file depending on how big your Windows partition is. Once finished, you'll have one actually large file and two smaller files.

Install Hyper-5 in Windows 8.1/10
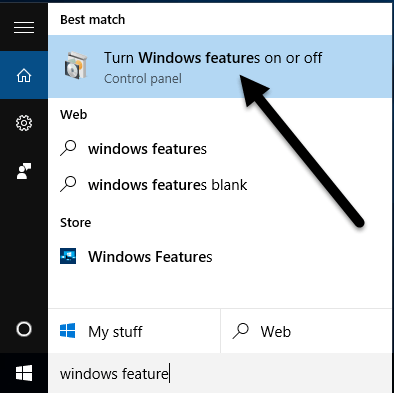
Adjacent, we take to install the Hyper-V tools in Windows 8.i or Windows 10 Pro. If you have the Home editions, yous'll have to upgrade to Pro before you lot can install Hyper-V. Click on Kickoff and blazon in windows features.
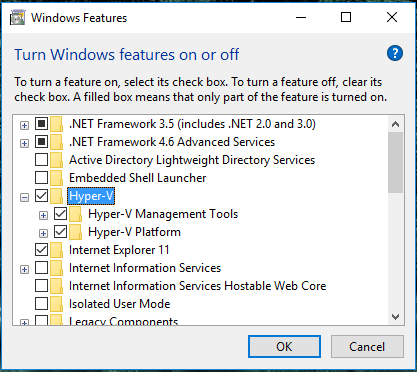
At the top, click on Turn Windows features on or off. A window will appear where you can check off extra items you lot desire to install. Go ahead and check the box for Hyper-Five. It should automatically cheque the boxes for Hyper-V Management Tools and Hyper-V Platform as well.
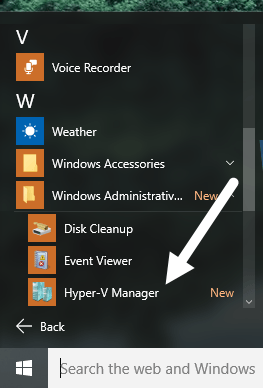
Click OK and let Windows install the features. You will also have to restart your computer. In one case you boot back up, click on Showtime, All Apps and so scroll down to Windows Administrative Tools. You should run into Hyper-V Director listed there. You lot tin can also simply click on Start and blazon in Hyper-5 to search for it.
Configuring Hyper-Five
At present for the fun office! Let'south go started with Hyper-V. Go ahead and open the Hyper-V Manager and you'll meet a bare workspace.
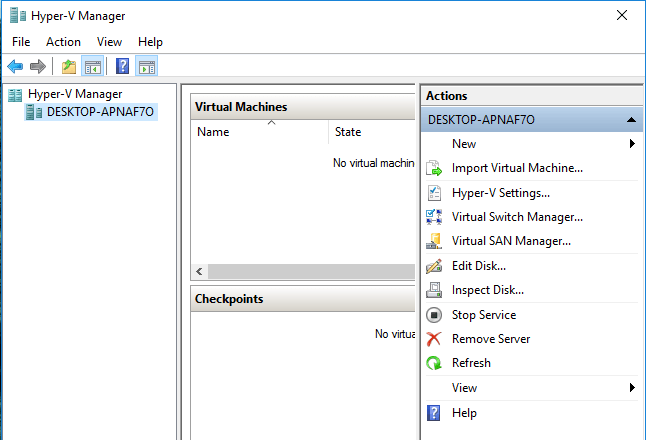
At the far left is the server, which should be the proper name of your calculator. In the heart section are the list of virtual machines and checkpoints. On the correct, you have a dynamic menu that changes depending on what item is selected in the left-hand sections. To get started, select the reckoner name at the far left.
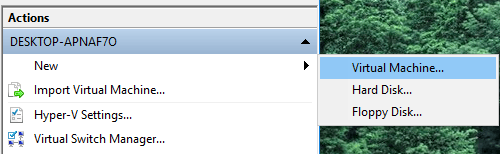
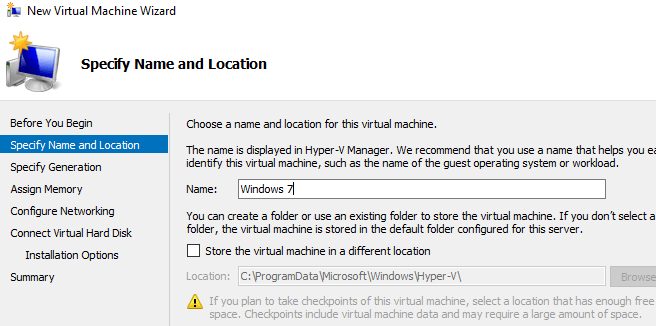
Now at the far right, click on New and so Virtual Car. This will bring upward the new virtual machine wizard. The first pace is to give your virtual machine a name.
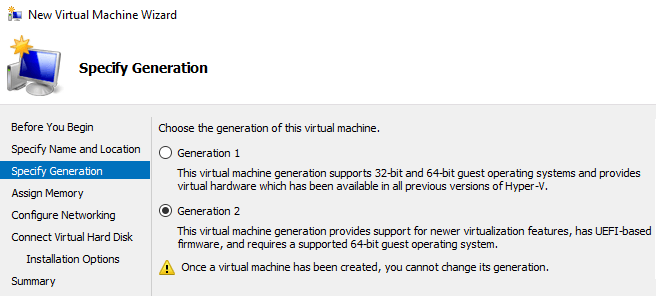
Next, yous have to choose the generation for the virtual machine. If y'all are converting a 64-fleck version of Windows to a virtual motorcar and your computer hardware supports UEFI, go ahead and cull Generation 2, since that allows for more advanced features. Apply Generation 1 for 32-bit versions of Windows or if your car is using legacy BIOS. Generation 2 also supports broad-screen displays when virtualizing Windows 8.1 or Windows x.
If you lot have no idea what all that means, only choose Generation 1 to be on the safe side. Note that if the virtual machine fails to boot, yous tin can easily just delete it and start this process again. Select a different generation and see if it boots up properly. Deleting the virtual machine inside Hyper-V does non delete your original VHDX files.
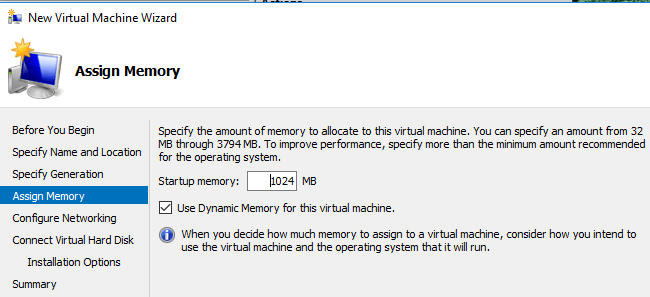
On the next screen, you accept to choose the amount of retention y'all want to assign to your virtual auto. I left it at the default value of 1024 MB, but you can increment information technology if you have plenty RAM bachelor on your host automobile.
Go alee and skip the Configure Networking screen for now because we will take to practice that after. For at present, merely leave it at Not Continued. On the Connect Virtual Hard Disk screen, you need to select Use an existing virtual hard disk.
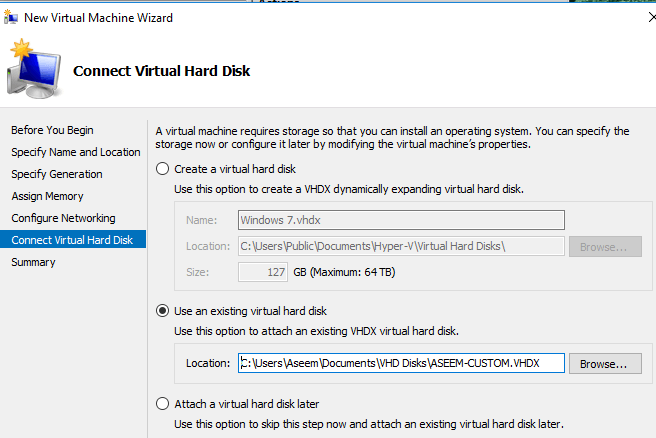
Click the Browse push and select the VHDX image that represents your actual Windows division. This should be the really big VHDX file. Nosotros will accept to manually add the other two VHDX drives after the wizard, which I volition show further down. At this point, review the summary and click Cease.
Now you should see a new detail listed nether Virtual Machines. If you click on this, you'll come across a bunch more than options in the right-hand pane also.
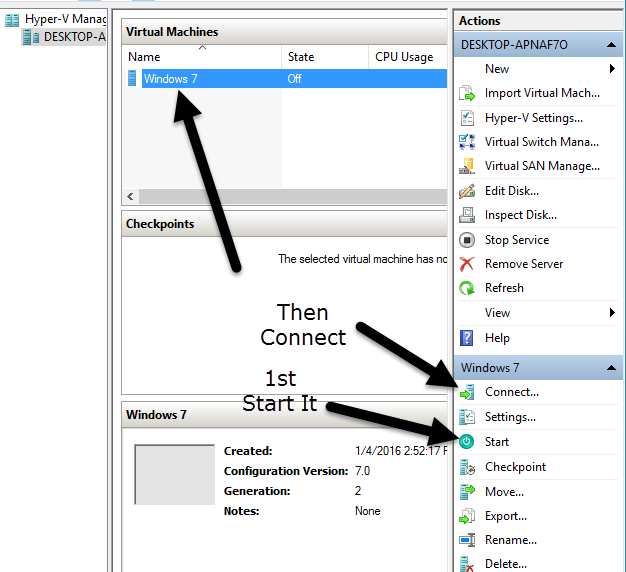
To start the virtual automobile, select it and and so click on Get-go. The State cavalcade volition change to Running. Next to view the virtual machine, click on Connect. If you did this now, you'll see that error message that I mentioned at the beginning of the article: Boot failure. We still need to add together the other difficult drives.
Select the virtual machine and click Turn Off. And so click on the Settings link. On the left hand side, y'all should see IDE Controller 0 and IDE Controller 1. Click on the Controller 0 first. If y'all chose Generation 2, you will meet SCSI Controller only.
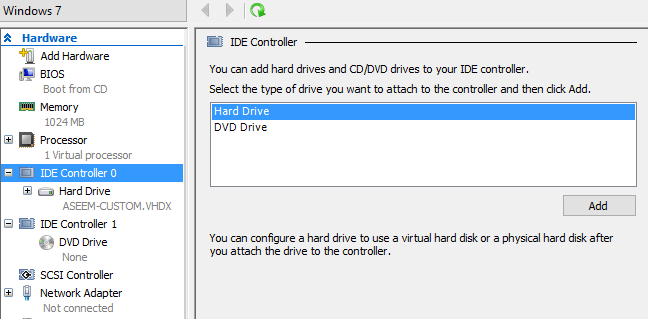
Yous volition see that the first VHDX file nosotros added in the wizard is already listed. Now we have to add the second and 3rd files. Make sure Hard Drive is selected and then click Add.
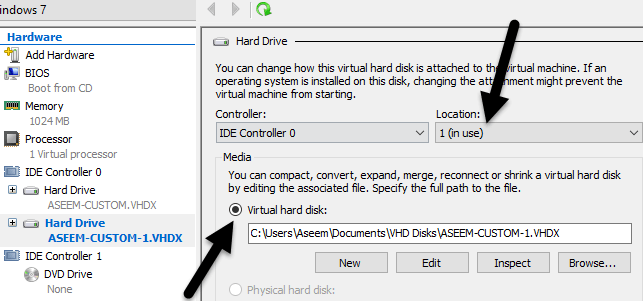
The Location box should automatically choose i since the 0 slot is taken by our first VHDX file. Each IDE Controller merely has two slots available for adding drives. Click Virtual hard disk and choose your second VHDX file.
Now click on IDE Controller 1 and then click the Add button once again. Do the same thing here, simply choose your third VHDX file.
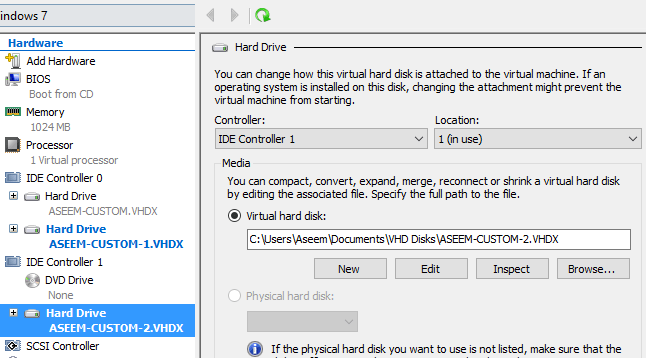
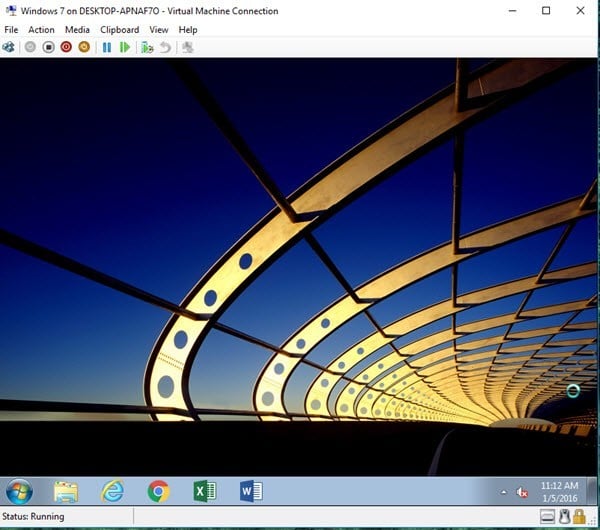
Now that nosotros take all three VHDX files attached, we can click OK and start upwards our virtual machine. This time you should hopefully become a screen with Windows loading!
Configure Networking
Lastly, we demand to setup networking for the virtual machine and so that y'all can connect to the local network and to the Cyberspace. To do this, click on Virtual Switch Managing director at the top of the correct hand menu.
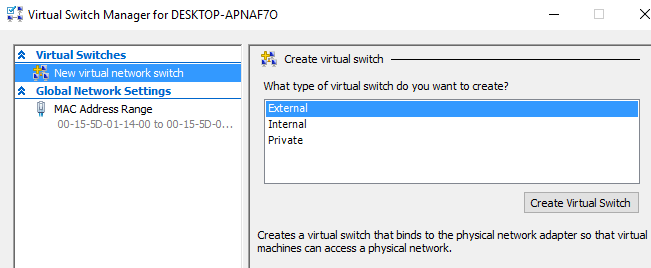
Click on New virtual network switch and then select External from the list box. Finally, click on Create Virtual Switch.

Give your virtual switch a name if you like and then choose the correct network from the dropdown box. If you lot have more than 1 network card, cull the ane that is connected to the network and Net. Once your switch has been created, nosotros demand to tell the virtual auto to use it. To practice that, click on the virtual machine in Hyper-V director and then click on the Settings link in the correct pane.
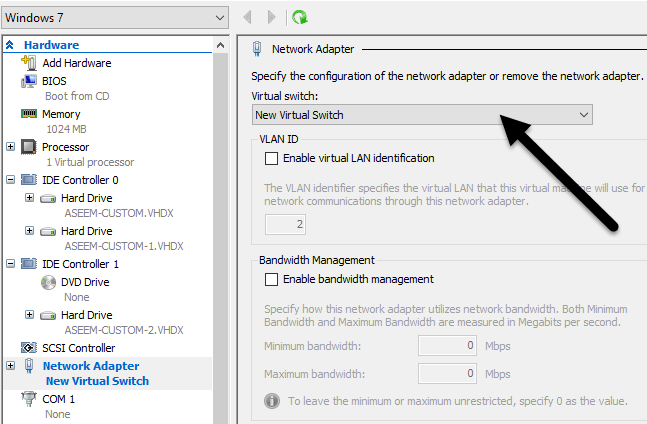
Click on Network Adapter and and so choose the new virtual switch that you lot created in the previous step. That'due south it! Now when y'all start upwards your virtual automobile, it should get network admission via the host computer.
Hopefully, this commodity helps you accept your current PC and catechumen it into a virtual car that you can run on the aforementioned PC or some other PC if you lot like. In that location are lots of things that can become wrong in this process, so feel free to annotate if yous meet problems. Savor!
Do not share my Personal Data.
Source: https://www.online-tech-tips.com/free-software-downloads/convert-pc-into-virtual-machine/
Posted by: mcleandentelf1969.blogspot.com
0 Response to "How To Make A Windows 95 Virtual Machine"
Post a Comment